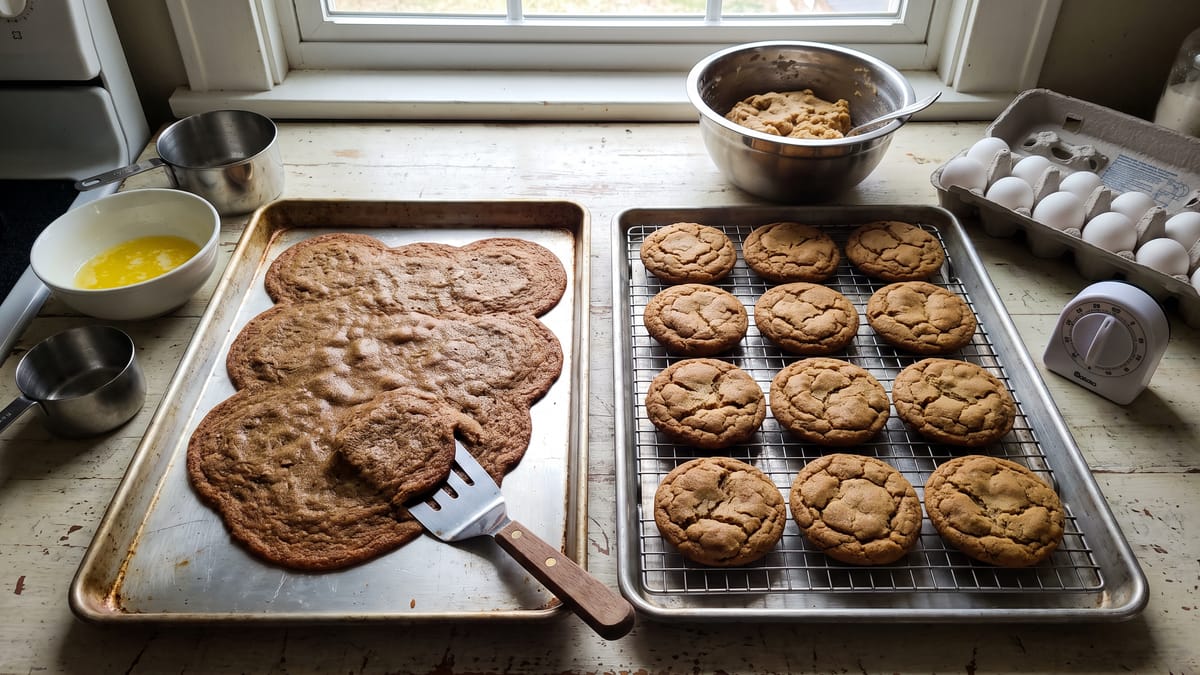
Why Your Cookies Spread Flat and How to Fix Them for Good
Ah, the humble cookie. A universally beloved treat, a symbol of comfort, and often, a source of immense baking frustration. We've all been there, haven't we? You follow a recipe diligently, the aroma fills your kitchen with promise, and then you open the oven door to a sad, flat expanse of what was supposed to be a plump, chewy, or delightfully crisp cookie. Instead, you're greeted by a dessert that resembles a pancake more than a cookie, a thin, crispy disk that shatters at the mere touch. It's disheartening, to say the least, and it can make even the most seasoned home baker question their culinary prowess.
But fear not, fellow baking enthusiasts! The mystery of the perpetually spreading cookie is not an unsolvable enigma. In our culinary journey today, we'll delve deep into the science behind why cookies spread flat and, more importantly, equip you with the knowledge and actionable strategies to banish those flat-cookie blues for good. We'll explore the main culprits, from the seemingly innocuous temperature of your butter to the often-overlooked freshness of your leaveners, and provide a comprehensive troubleshooting guide to ensure your cookies emerge from the oven perfectly formed every single time. Get ready to reclaim your cookie confidence and transform your baking from guesswork to glorious success.
The Unsung Hero: Butter Temperature and Its Profound Impact
Let's begin with a primary offender, one that often escapes scrutiny: the temperature of your butter. Many recipes simply state "softened butter," leaving much to interpretation, and this ambiguity can be a significant pitfall. The truth is, butter temperature is not just a suggestion; it's a critical factor in determining the final texture and structure of your cookies. When butter is too warm, it's akin to building a house on a shaky foundation.
The ideal butter temperature for most cookie recipes, particularly those relying on the creaming method, is a cool 65–68°F (18–20°C). At this temperature, butter is pliable enough to hold a thumbprint without feeling greasy or looking melted. Why is this specific temperature so crucial? When you cream butter and sugar together, the butter, with its precisely structured fat molecules, is designed to trap air. These tiny air pockets are what give cookies their lift and lightness. If your butter is too cold, it won't cream properly, resulting in a dense dough and a lack of aeration. Conversely, and more pertinent to our flat cookie dilemma, if your butter is too warm, it can't hold those precious air pockets effectively. The fat essentially separates and becomes too liquidy, unable to maintain its structure.
Imagine trying to whip air into a puddle of oil; it's simply not going to happen. The same principle applies here. When your butter is too warm, it melts too quickly in the oven, releasing its trapped air prematurely and causing the cookie to spread out before its structure has a chance to set. This rapid melting also means the dough loses its internal support system, leading to that undesirable pancake-like appearance.
To ensure your butter is at the perfect temperature, plan ahead. Take it out of the refrigerator about 30–60 minutes before you intend to bake, depending on your kitchen's ambient temperature. If you're in a hurry, you can cut the butter into smaller pieces to speed up the warming process, but avoid microwaving it, as this often creates unevenly melted spots. A simple touch test is your best friend here: it should be cool to the touch, not greasy, and yield slightly when pressed.
The Foundation of Structure: The Critical Role of Flour Measurement
If butter temperature is the unsung hero, then flour measurement is the bedrock of your cookie's architectural integrity. This is where many home bakers, through no fault of their own, inadvertently sabotage their cookies. The common practice of measuring flour by volume rather than weight can lead to significant inaccuracies, and this seemingly small error has colossal consequences for cookie structure.
Volume measurements are inherently inconsistent, as flour density varies with handling and storage, often resulting in less flour than the recipe's weight standard intends. Conversely, if you lightly spoon flour into a measuring cup, you might still be off. The problem lies in the inherent variability of volume measurements for dry ingredients. Flour, in particular, can vary wildly in density depending on how it's stored and how it's handled. Too little flour means your cookie dough lacks the necessary structural components to hold its shape. It's like trying to build a sturdy wall with too few bricks; the whole edifice is destined to collapse.
The scientific solution, and our most emphatic recommendation, is to embrace the digital scale. Weighing flour is not just for professional bakers; it's a simple, game-changing technique that brings unparalleled accuracy to your kitchen. For all-purpose flour, the standard measurement is 120 grams per cup. By weighing your flour, you eliminate the guesswork and ensure you're incorporating the precise amount needed to give your cookies the strength to resist spreading. This small investment in a digital scale will pay dividends in consistent, perfectly structured cookies.
When your dough has insufficient flour, it's inherently weaker. As the butter melts in the oven, there isn't enough flour to absorb the moisture and create a robust gluten network that can support the cookie's expanding shape. The result is a dough that spreads rapidly and thinly, unable to maintain its original form. Make the switch to weighing your flour; it's a fundamental step towards cookie perfection.
The Invisible Workhorses: Leavener Freshness and Potency
Baking soda and baking powder are the unsung heroes of lift, the invisible workhorses that transform a dense lump of dough into a light, airy, or chewy cookie. Yet, their potency is often overlooked, and using expired leaveners is a common, silent culprit behind flat, dense cookies. These chemical leavening agents don't last forever, and their effectiveness diminishes significantly over time.
Baking soda, which reacts with acidic ingredients in a recipe, and baking powder, which contains both an acid and a base (and often reacts twice, once with moisture and again with heat), are designed to produce carbon dioxide gas. These gas bubbles are what create the rise and open crumb structure in your baked goods. However, once opened, both baking soda and baking powder begin to lose their oomph. We recommend replacing them every 6–12 months. An easy way to remember this is to mark the date you opened the box or can directly on the container.
To test the freshness of baking soda, mix a teaspoon with a few tablespoons of vinegar or lemon juice. If it fizzes vigorously, it's still good. For baking powder, mix a teaspoon with a few tablespoons of hot water. A strong fizz indicates it's still potent. If you see little to no reaction, it's time to toss it and buy a fresh batch. Using expired leaveners means your cookies simply won't get the lift they need. The dough will remain dense, heavy, and, yes, it will spread flat because there's no internal gas production to help it hold its shape and expand upwards. This lack of aeration leaves you with a cookie that's not only flat but often disappointingly tough or chewy in an unappealing way.
The Unseen Variable: Oven Calibration and Its Deceptive Nature
We often trust our ovens implicitly, assuming that the temperature we set is the temperature we get. Unfortunately, this is a common misconception that can lead to a myriad of baking woes, including our dreaded flat cookies. An oven that runs cooler than the set temperature is a notorious saboteur of cookie structure.
When your oven is too cool, cookies have an extended period to spread before their structure can set. Heat is what triggers the chemical reactions in the leaveners, causes the butter to melt, and ultimately, sets the proteins and starches in the flour, firming up the cookie's shape. If the oven temperature is too low, these processes happen too slowly. The butter melts and spreads before the flour and leaveners have a chance to create a stable framework, resulting in a thin, wide cookie.
The solution here is remarkably simple and inexpensive: invest in an oven thermometer. These small, metal gauges hang or sit inside your oven and provide an accurate reading of its actual temperature. You might be surprised to find that your oven is consistently 25, 50, or even more degrees off from what the dial indicates. Once you know your oven's true temperature, you can adjust accordingly. If your oven runs 25 degrees cool, for example, you'd set it 25 degrees higher than the recipe calls for. This simple calibration step can dramatically improve your baking results, ensuring your cookies set quickly and maintain their desired shape.
The Power of Patience: The Magic of Chilling Cookie Dough
If there's one step that many home bakers are tempted to skip in the pursuit of instant gratification, it's chilling cookie dough. However, chilling is not merely a suggestion; it's a transformative process that significantly reduces spread and enhances the flavor and texture of your cookies. It's a non-negotiable step for achieving consistently perfect results.
Chilling dough for at least 30 minutes, and ideally 2 hours to overnight, solidifies the fat within the dough. Remember our discussion about butter temperature? When the butter is cold and firm, it melts much more slowly in the oven. This slower melting gives the flour and leaveners ample time to do their work, setting the cookie's structure before it has a chance to spread excessively. Think of it as providing a strong internal scaffold that resists the forces of gravity and heat.
Beyond solidifying the fat, chilling also allows the flour to fully hydrate. This means the flour absorbs more moisture from the dough, leading to a firmer, less sticky consistency. A well-hydrated flour creates a stronger gluten network, which further contributes to the cookie's ability to hold its shape. Furthermore, chilling allows the flavors to meld and deepen, resulting in a more complex and delicious cookie. The sugar granules also have more time to dissolve, contributing to a chewier texture.
So, resist the urge to bake immediately. Plan ahead, chill your dough, and revel in the superior texture and reduced spread that this simple act of patience provides. You can even make a large batch of dough, chill it, and bake off a few cookies at a time, enjoying fresh-baked treats whenever the craving strikes.
Beyond the Big Five: Other Factors Contributing to Cookie Spread
While butter temperature, flour measurement, leavener freshness, oven calibration, and chilling time are the primary culprits, several other factors can also contribute to unwanted cookie spread. Understanding these nuances will further empower you in your quest for cookie perfection.
Over-Creaming Butter and Sugar: While creaming is essential for incorporating air, there's a fine line between adequately aerated and over-aerated. Creaming butter and sugar for only 2–3 minutes until pale and fluffy is usually sufficient. Over-creaming adds excessive air, which can cause the cookies to rise dramatically in the oven only to collapse and spread flat as they cool, much like a soufflé. The goal is enough air for lift, not so much that it compromises structural integrity.
High Sugar Content: Sugar, while vital for flavor and texture, liquefies in the oven. A very high sugar content can contribute to increased spread because as it melts, it adds more liquid to the dough, causing it to flow outwards. If you consistently find your cookies spreading, you might try reducing the sugar by a few tablespoons. This subtle adjustment can often reduce spread without compromising the cookie's overall deliciousness.
Baking Surface Matters: The surface you bake on can influence spread. Silicone baking mats, while excellent for non-stick properties, insulate more than parchment paper. This insulation can slow down the cookie's ability to set, giving it more time to spread before it firms up. If you're struggling with spread, try baking on parchment paper, which allows for quicker heat transfer and faster setting.
Hot Baking Sheets: This is a common oversight. Placing fresh cookie dough on a hot baking sheet, one that just came out of the oven from a previous batch, causes the butter in the dough to melt almost instantly. This immediate melting leads to rapid spreading before the cookie has any chance to set. Always use cool or room-temperature baking sheets. If you're baking multiple batches, rotate with a second set of sheets or allow your sheets to cool completely between batches.
Ingredient Ratio Imbalances: At its core, excessive spreading can often be attributed to an imbalance in the ingredient ratios, specifically too much butter or sugar relative to too little flour. This goes back to accurate measurement. If you're measuring by volume and consistently getting less flour than intended, or if you've slightly increased the fat or sugar, the delicate balance of the recipe can be thrown off, leading directly to a weaker, more spread-prone dough. Adhering to precise measurements, especially by weight, is the ultimate corrective action here.
Prioritized Troubleshooting Checklist: Your Path to Cookie Perfection
Now that we've dissected the common culprits, let's consolidate our knowledge into a practical, prioritized troubleshooting checklist. When your cookies spread flat, tackle these issues in order for the most impactful results:
- 1. Check Your Butter Temperature (65–68°F / 18–20°C): This is often the most significant factor. Ensure your butter is cool to the touch and pliable, not greasy. If it's too warm, pop it back in the fridge for a few minutes.
- 2. Weigh Your Flour (120 g per cup): This is a non-negotiable step for accuracy. Invest in a digital scale and use it. This eliminates the variability of volume measurements and ensures your dough has adequate structure.
- 3. Verify Leavener Freshness (Replace Every 6–12 Months): Test your baking soda and baking powder. If they don't fizz vigorously, it's time for fresh supplies.
- 4. Calibrate Your Oven with a Thermometer: Don't trust your oven's dial. An inexpensive oven thermometer will tell you the truth, allowing you to adjust your oven setting accordingly.
- 5. Chill Your Dough (Minimum 30 minutes, ideally 2+ hours): This step is crucial. It solidifies the fat, hydrates the flour, and significantly reduces spread. Don't skip it!
- 6. Avoid Over-Creaming: Cream butter and sugar for only 2–3 minutes until pale and fluffy, not longer.
- 7. Use Cool Baking Sheets: Never place dough on a hot baking sheet. Allow sheets to cool completely between batches or rotate with a second set.
- 8. Consider Your Baking Surface: If using silicone mats, try parchment paper for a batch to see if it reduces spread.
- 9. Review Sugar Content: If all else fails, a slight reduction in sugar (a tablespoon or two) can sometimes help.
To Bring Things to a Close
The journey to consistently perfect cookies, those delightful morsels that hold their shape and deliver on every promise of flavor and texture, is one of understanding and precision. By grasping the scientific principles behind why cookies spread flat, we empower ourselves to become more intuitive and successful bakers. It's rarely a single factor but often a combination of subtle missteps that lead to the dreaded flat cookie.
Remember, baking is a science, but it's also an art. With a bit of attention to detail, a willingness to troubleshoot, and the invaluable insights we've shared today, you are now well-equipped to banish flat cookies from your kitchen for good. So go forth, bake with confidence, and enjoy the immensely satisfying reward of a perfectly formed, utterly delicious cookie. Your baking journey just got a whole lot sweeter.
Sources
- • Why Your Cookies Are Flat and How to Fix Them, According to a Pastry Chef
- • recipe.net · articles · why-are-my-cookies-flat-how-to-preventWhy Are My Cookies Flat? How to Stop Cookie Spreading
- • 5 Reasons Your Cookies Could Be Too Flat - Southern Living
- • Why Are My Cookies Flat? 8 Causes and How to Fix Them
- • Why cookies spread flat, and how I fix it every time - Yahoo Creators
- • Why Are Your Cookies Flat? Here's Why—and How to Fix It
- • Why Are My Cookies Flat? How To Prevent Spreading
- • Why are My Cookies Flat?