How to Pipe and Assemble Perfect Lamingtons Without the Mess
Lamingtons. Just the word conjures images of delicate, fluffy sponge cake, enrobed in a luscious chocolate glaze, and generously coated in snowy desiccated coconut. They are a beloved classic, a staple of Australian bakeries and a nostalgic treat for many. Yet, for all their simple elegance, making lamingtons at home can sometimes feel like a culinary obstacle course, fraught with crumbling cakes, streaky chocolate, and a blizzard of rogue coconut. We've all been there, standing amidst a sticky mess, wondering how the professionals achieve those picture-perfect squares.
Fear not, fellow home bakers! We've dedicated ourselves to demystifying the art of lamington creation, focusing on the techniques that guarantee a smooth, even coating and a pristine finish, all while minimizing the usual kitchen chaos. We're going to walk through each stage, from preparing your sponge to the final flourish of coconut, ensuring your next batch of lamingtons looks like it came straight from a gourmet patisserie. Get ready to elevate your lamington game from haphazard to heavenly.
The Foundation: Crafting Your Perfect Sponge Cake
Every magnificent lamington begins with an equally magnificent sponge cake. This isn't the time for dense, heavy cakes; we're aiming for light, airy, and resilient. A classic butter cake or a simple vanilla sponge will do beautifully, but the key isn't just in the baking, it's in the preparation after baking.
We recommend using a sturdy sponge cake, baked in a rectangular tin, perhaps a standard 9x13 inch pan. Once baked and cooled completely, the sponge needs to firm up. This is a crucial step that many overlook. A freshly baked sponge, while delicious, is too delicate for the rigors of dipping and coating. It will crumble and fall apart, leading to an uneven, messy finish.
The secret to a resilient sponge lies in time. Your sponge cake must be at least a day old before you even think about cutting or dipping it. If you're short on time, or simply want to get ahead, you can bake your sponge, cool it completely, wrap it tightly in plastic wrap, and then freeze it. Freezing the cake for a few hours, or even overnight, makes it much easier to handle and prevents crumbling. This firmness is your first line of defense against a messy lamington assembly.
Precision Cutting: The Art of Uniform Cubes
Once your sponge cake is adequately firm, whether day-old or freshly thawed from the freezer, it's time to transform it into the iconic lamington squares. Precision here is paramount. Uniformly sized cubes not only look more professional, but they also ensure an even coating of chocolate and coconut.
First, gently trim any crusty edges from your sponge cake. These edges tend to be drier and can interfere with the smooth application of the glaze. A serrated knife works best for this, using a gentle sawing motion rather than pressing down, which can compress the cake.
Next, cut your sponge into even cubes. A common size is around 1.5 to 2 inches (4-5 cm) per side, yielding anywhere from 16 to 32 squares from a standard rectangular cake. For accuracy, a ruler can be your best friend. Mark your cuts lightly on the top of the cake before slicing all the way through. Remember, clean, straight cuts are essential for that bakery-neat appearance.
After cutting, we advise freezing these individual sponge cubes for an additional 30 to 60 minutes, or even up to 2 hours. This brief freeze firms them up even further, making them incredibly easy to handle during the dipping process. This step is a game-changer for maintaining the structural integrity of your lamingtons and ensuring clean, sharp edges.
The Heart of the Lamington: Filling with Jam and Cream (Optional but Recommended)
While classic lamingtons are often simply coated sponge, many prefer the delightful surprise of a jam and cream filling. If you're opting for this extra layer of indulgence, the timing of this step is important.
Before you even think about dipping your sponge cubes in chocolate, you'll need to prepare your filled lamingtons. Carefully split each chilled sponge cube horizontally through the middle, creating two thinner squares.
For the filling, a good quality raspberry or strawberry jam is traditional. For the cream, we suggest using freshly whipped cream, slightly sweetened if you prefer, and perhaps stabilized with a touch of icing sugar to help it hold its shape.
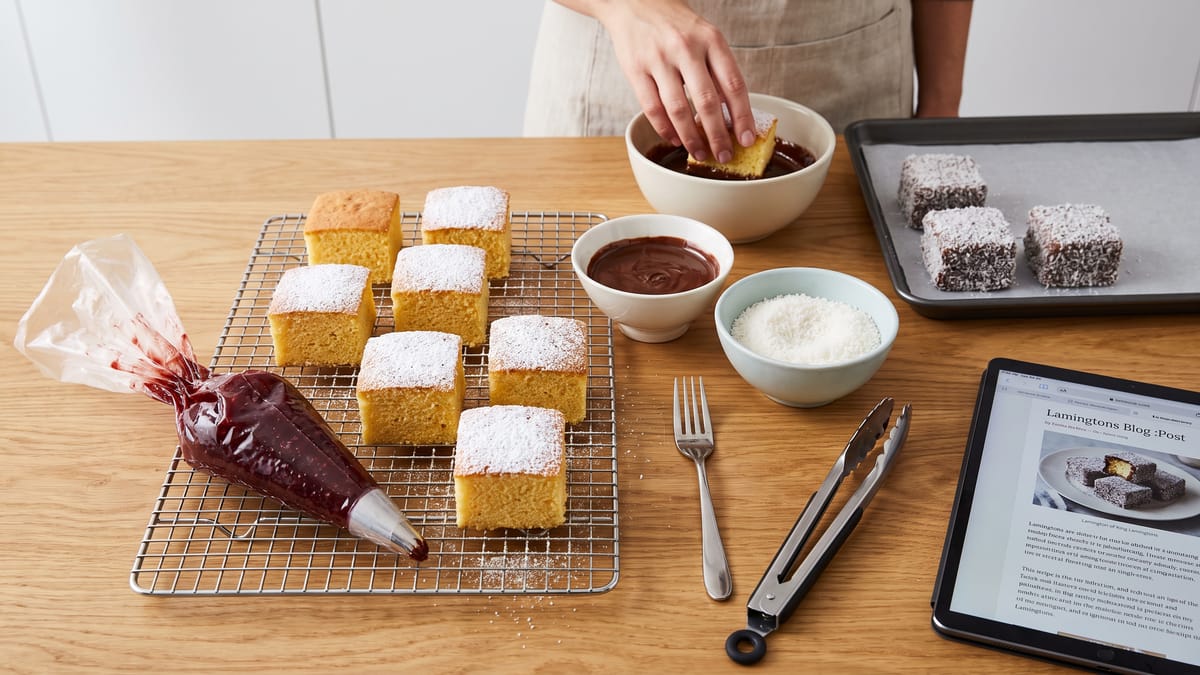
To achieve a neat and professional-looking filling, piping is key. Load your jam into one piping bag and your whipped cream into another. Pipe a small, even layer of jam onto one half of the sponge, followed by a swirl of whipped cream. Then, gently sandwich the other half of the sponge on top.
Once assembled, it's crucial to chill these filled sponge sandwiches again. Place them back in the freezer for at least 30 minutes to firm up the cream and jam. This prevents oozing during the dipping process and helps maintain the lamington's shape. This extra chilling step is vital for a clean, mess-free chocolate coating.
The Glorious Glaze: Crafting the Perfect Chocolate Dip
Now for the star of the show, the chocolate glaze. This isn't just melted chocolate; it's a carefully crafted, fluid coating that adheres beautifully and evenly. The consistency of your glaze is paramount to achieving those smooth, streak-free lamingtons. We're aiming for a consistency that is thin enough to run off a spoon in a steady stream, similar to the viscosity of warm honey.
Our preferred method for preparing the glaze involves a bain-marie, or a double boiler. This gentle heating method is crucial for keeping your chocolate glaze warm, fluid, and glossy throughout the entire dipping process. Place a heatproof bowl containing your glaze ingredients (typically cocoa powder, icing sugar, butter, and milk) over a saucepan of barely simmering water. The steam from the simmering water will gently heat the bowl, keeping the glaze at the ideal temperature without scorching it. Stir frequently until everything is melted and combined into a smooth, luscious liquid.
It's vital that the water in the saucepan is barely simmering, not boiling vigorously. Too much heat can cause the chocolate to seize or become too thick. We want a consistent, gentle warmth that maintains the glaze's runny quality. If the glaze starts to thicken during the dipping process, a quick stir over the bain-marie will bring it back to the perfect consistency.
The Dipping Dance: Mastering the Chocolate Coating
With your firm sponge cubes (or filled sponge sandwiches) chilled and your chocolate glaze perfectly warm and fluid over the bain-marie, it's time for the main event: the dipping. This is where many home bakers encounter challenges, but with the right technique, it becomes a smooth, satisfying process.
First, set up your workstation efficiently. Have your warm chocolate glaze ready, a tray of desiccated coconut (we'll talk more about this in a moment), and a wire rack placed over a sheet of parchment paper or baking tray to catch any drips. This setup helps minimize mess and allows for a smooth workflow.
For dipping, we strongly recommend using two forks, not your fingers. Using forks prevents finger marks on your beautifully coated lamingtons and allows for a cleaner, more even application. Gently spear one chilled sponge cube with one fork, holding it securely.
Now, carefully submerge the sponge cube into the warm chocolate glaze. Using the second fork, gently turn the cube to ensure all sides are thoroughly coated. We find that dipping 3 to 6 sponge squares at once in the glaze can lead to more even absorption and faster coating, but be mindful not to overcrowd the bowl, which can cool the glaze too quickly.
Once fully coated, lift the lamington out of the glaze with the first fork. Hold it over the bowl, allowing any excess glaze to drip off. You can gently tap the fork against the edge of the bowl to encourage drips. The goal is a thin, even layer of chocolate, not a thick, clumpy one. A thin layer sets more quickly and looks far more professional.
The Snowy Finish: Conquering the Coconut Coating
Immediately after dipping and allowing the excess chocolate to drip, it's time for the coconut. This step, while seemingly simple, often leads to the most mess if not managed properly.
Spread a generous amount of fresh desiccated coconut in a shallow tray or dish. We emphasize "fresh" coconut because it's dry and separate, allowing for an even coating. As you coat lamingtons, the coconut will inevitably become clumpy with chocolate. This is why working in small batches and refreshing your coconut is crucial.
Gently transfer the chocolate-coated lamington from the fork directly into the tray of coconut. Using your clean hands (or a second, clean fork if you prefer), gently roll and press the lamington into the coconut, ensuring all sides are completely covered. Don't be shy here; a good, thick layer of coconut is part of the lamington's charm.
Once coated, carefully transfer the lamington to the prepared wire rack. The wire rack allows air to circulate around all sides, helping the chocolate set evenly and preventing a soggy bottom. Repeat this process with the remaining sponge cubes, refreshing your desiccated coconut as needed. When the coconut in your tray starts to clump and stick together, simply discard it and replenish with fresh, dry coconut. This ensures each lamington gets an even, pristine coating.
The Waiting Game: Setting and Storage
Once all your lamingtons are beautifully coated in chocolate and coconut and resting on the wire rack, the hardest part begins: waiting. It's crucial to allow the coated lamingtons to set completely. This typically takes at least 1 hour, though 30 to 60 minutes in a cool room is often sufficient. During this time, the chocolate glaze will firm up, creating a stable, non-sticky exterior. Trying to stack or move them before they are fully set will result in smudges and a less-than-perfect appearance.
Once set, your perfect lamingtons are ready to be enjoyed! Store them in an airtight container at room temperature for a few days, or in the refrigerator for extended freshness, especially if they contain cream. If storing in the refrigerator, allow them to come to room temperature for about 15-20 minutes before serving for the best texture and flavor.
Putting It All Together
Creating perfect lamingtons without the mess is entirely achievable with a methodical approach and attention to a few key details. From ensuring your sponge cake is firm and chilled, to maintaining the ideal consistency of your chocolate glaze over a bain-marie, and mastering the two-fork dipping technique, each step plays a vital role. Remember to refresh your desiccated coconut frequently and allow ample setting time on a wire rack.
These techniques, honed through countless batches, will transform your lamington-making experience from a messy endeavor into a graceful culinary art. The result? Bakery-quality lamingtons with smooth, even coatings, sharp edges, and that irresistible balance of soft sponge, rich chocolate, and delicate coconut. So, gather your ingredients, follow these steps, and prepare to impress your family and friends with a batch of lamingtons that are as beautiful to behold as they are delicious to devour. Happy baking!